Sunday, February 21, 2016

[Analytics Dashboards]How to Create a Dashboard in WSO2 Dashboard Designer.


In this blog post I'm demonstrating you how to create a dashboard in WSO2 Dashboard Designer.
WSO2 Dashboard Designer is an application which facilitate to create our own dashboards .

You need WSO2 Data Analytic Server for this.

You can access the analytics dashboard application in WSO2 DAS through the following URL.
https://<HOST_NAME>:<PORT>/portal/dashboards


Then you will receive the login screen as shown below.


After the login you can see the dashboards which are already created.To create a new dashboard click on CREATE DASHBOARD button.


Then You can see the Dashboard Configuration window as shown below. There you need to give a proper name and a description of the dashboard(optional).


After you click on Next you will receive a window to choose a layout for the dashboard.
In that layout you can add gadgets to the dashboard.


Click on following icon and then click on DASHBOARD from drop down.


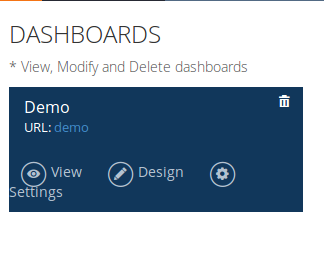
Now you can view the created dashboard as shown below.

 
You can View your dashboard by click on “View” and you can edit the dashboard by click on “Design”.
Now you are done with creating a dashboard in WSO2 Dashboard designer.After creating the dashboard you can add gadgets to the dashboard.


Saturday, February 13, 2016

[WSO2 ESB] How to Use Property Mediator.


Prerequisites.

WSO2 ESB.

In this post I'm going to demonstrate how to use the ESB property mediator.
The property mediator can use as a variable in programming language. We can set a value in the property mediator and we can use it by property name in other operations of the code.
In the following example proxy , I added a property called “CompanyName” and used it inside the log mediator .

Steps to add a Property Mediator.

Go to design view of your created proxy service.
Then click on Add Child → Core → Property


  Then you will get a property mediator setting console as shown in below figure.


Name : A name for the property.

Action : Using this we can set or remove a property from the message context.

Set Action as : If you are setting a static value for the property then you need select the Value option . If you are setting a dynamic value for the property then you need to select Expression option.

Type: Data type of the property. (String, Boolean, Integer, float, long etc.)

Value : value of the property. If you are setting a dynamic value for the property then you need to use the Xpath expression here.

Ex: If you need to set the Id as a property from following XML response,
<project>
<id>10</id>
<name>WSO2 Governance Registry</name>
</project>

then you need to set the following Xpath as the value.
//project/id
Pattern: We can use regular expression here to evaluate value or expression of the property.

After adding the property then you can use it by property name in other operations.
You can retrieve the property value by using 'get-property('Name of the Property')'.

In the following example proxy I used the above property (CompanyName) inside the log mediator.
Then the output is as shown below.


 Proxy
       
<proxy name="Demo" startonload="true" statistics="disable" trace="disable" transports="https,http" xmlns="http://ws.apache.org/ns/synapse">
   <target>
      <insequence>
         <property name="CompanyName" scope="default" type="STRING" value="WSO2">
         <log>
            <property expression="get-property('CompanyName')" name="Value_Of_Property">
         </property></log>
      </property></insequence>
   </target>
   <description>
</description></proxy>


References [1].https://docs.wso2.com/display/ESB481/Property+Mediator

Saturday, January 30, 2016

How to add jQuery TableSorter

In this blog post I am going to demonstrate how to add a table sorter to a HTML table.

Prerequisites
1.jquery.min.js [download]
2.jquery.tablesorter.min.js [download]
Code
index.html
       
 
<html>
<head>
<title>TableSorter Demo</title>
<!-- link to css file -->
<link href="css/style.css" rel="stylesheet"></link>
<!-- Jquery library -->
<script src="js/jquery.min.js" type="text/javascript"></script>
<!-- Jquery tablesorter library -->
<script src="js/jquery.tablesorter.min.js" type="text/javascript"></script>
<script src="js/table.js" type="text/javascript"></script>
<script>
 $(function() {
  $("#demoTable").tablesorter();
 });
</script>
</head>
<body>
 <table id="demoTable">
  <thead>
<tr>
    <th class="sortUpImg">Name</th>
    <th class="sortUpImg">Age</th>
   </tr>
</thead>
  <tbody id="rows">
  </tbody>
 </table>
</body>
</html> 


table.js
       
$(function() {
 // JSON data array
 var employees = [ {
  "Name" : "John",
  "Age" : "20"
 }, {
  "Name" : "Ann",
  "Age" : "15"
 }, {
  "Name" : "Peter",
  "Age" : "60"
 } ];
 // bind the data with tbody
 for (var i = 0; i < employees.length; i++) {
  $("#rows").append(
    "" + employees[i].Name + "<br />
"
      + employees[i].Age + "<br />
");
  
  $("#demoTable").trigger("update");

 }

});           


style.css
       
table {
 border-collapse: collapse;
 width: 100%;
}

td {
 text-align: left;
 padding: 5px;
 border: 1px solid #ddd;
}

tr:nth-child(even) {
 background-color: #F9B36D
}

th {
 
}

.sortUpImg {
 background: url(../img/bg.gif) no-repeat 99%;
 background-color: #F77D03;
 color: white;
 padding: 15px;
 text-align: left;
 border: 1px solid #ddd
}  


Download the source code. [Click Here]

Sunday, December 6, 2015

How to Develop A Proxy Service in WSO2 Dev Studio & Deploy in WSO2 ESB.


Prerequisites


1. WSO2 Developer studio .
2. WSO2 Enterprise Service Bus (ESB) .
In this blog post I am describing you how to develop a proxy service in WSO2 Developer Studio and deploy in WSO2 ESB.
First you need to create an “ESB Config Project” in WSO2 Dev Studio.
Open Developer Studio Dashboard. Select "ESB Config Project" as shown below and create a project.


The structure of the project is as shown below.

Now create a proxy service. Right click on “proxy-services” and select “create new proxy service.” from the drop down menu.
Here I used the following example proxy service .
 
  
Then you need to create a CAR file. To do that you need to create a “Composite Application Project”.
Right click on the ESB Config Project which was created early. Then select
New → Project → Composite Application Project.
 Right Click on the “Composite Application Project” which you created. Then select “Export Composite Application Project” from the drop down menu.
Give a location to save the CAR file.
Then go to that file location and you will be able to see the CAR file .zip folder.

How to Deploy the CAR file in WSO2 ESB?

Go to ESB Management Console and Select “Main” tag. Then go to “Carbon Application” section and click on “Add”.


Then you can see the following console. Click on “Browse” and add the created CAR file and click on “Upload”.


  The CAR file will be listed under the Carbon Application list as shown below.

Click on the CAR file which is in the Carbon Application List. Then you will receive the console as shown below.To run the proxy click on “Try This Service” .