Sunday, February 21, 2016

[Analytic Dashboards] Inter Gadget Communication.


In this blog post I'm going to demonstrate you how to build a communication between two gadgets in a dashboard.

Inter gadget communication

Let's think there are two gadgets in a dashboard called Gadget-A and Gadget-B. Through inter gadget communication these two gadgets can talk to each other. In simply the Gadget-A can send a message to Gadget-B and then the Gadget-B can update according to that message.
This is based on publisher-subscriber pattern. In this pattern what happen is the publisher publish a message through a channel and the subscriber listen to this channel and fetch the message and get updated according to the message.


As shown in above diagram a subscriber can subscribes to multiple channels and also publisher can publishes to multiple channels.

Implementation of Example Gadgets.

In this example I created two separate gadget called publisher-gadget and subscriber-gadget. In publisher gadget I created a simple drop down menu. From it we can select a name of a fruit.In subscriber gadget I created a view to display image of the fruit.

When we select a fruit name in publisher gadget then the publisher notify the selected fruit name to subscriber gadget. Then the subscriber gadget fetch the fruit name and display the image of the fruit.


Publisher Gadget.

Create a custom gadget folder inside ,
<DAS_HOME>/repository/server/jaggeryapps/portal/store/carbon.super/gadget/ 

Here I named my custom gadget folder as "publisher-gadget" . And the folder structure of the publisher gadget is as shown below.


Gadget.json

{
"id": "Publisher",
"title": "Publisher",
"type": "gadget",
"thumbnail": "store://gadget/publisher-gadget/index.png",
"data": {
"url": "store://gadget/publisher-gadget/index.xml"
},
"notify": {
"select": {
"type": "fruits",
"description": "This notifies selected fruit name"
}
}
}

The highlighted part need to add when the gadget is a publisher. Publisher notify the message through the channel(The Channel name is "select" and you can give a type name as you like.Here the type is fruit) .
Index.xml

<ModulePrefs title="Publisher" height="250" description="Publisher-gadget">
<Require feature="pubsub-2"/>
</ModulePrefs>

when we implement inter gadget communication we need to import the feature pubsub-2.


List.js

This file includes the javascript code.

 //get selected option of the selector
        var selection = $("#fruitList option:selected").text();
        //publish the selected option
        gadgets.Hub.publish('select', {
            msg : selection
        });

We need to include the above highlighted code snippet to publish the message to the subscriber.


Subscriber Gadget

The folder structure of the gadget.


"img" folder contains the all the images which are used in this gadget and "js" folder contains the javascript files.
 
Gadget.json

{
   "id": "subscriber",
   "title": "subscriber",
   "type": "gadget",
   "thumbnail": "store://gadget/subscriber-gadget/index.png",
    "data": {
              "url": "store://gadget/subscriber-gadget/index.xml"
},
   "listen": {
   "state-selected": {
    "type": "fruits",
   "description": "Used to filter based on state"
   }
}

you need to add above highlighted code snippet to show this is the subscriber gadget. Here "state-selected" indicates the channel which the subscriber is listening and the "type" indicates the type of the data coming through this channel .

Index.xml

Similar to the publisher gadget we need to import the pubsub-2 feature in the subscriber gadget as shown in below code snippet.

<ModulePrefs title="subscriber" height="250" description="subscriber-gadget">
<Require feature="pubsub-2"/>
</ModulePrefs>


subscriber.js

gadgets.HubSettings.onConnect = function () {
gadgets.Hub
          .subscribe(
                  'state-selected',
                           function (topic, data, subscriberData) {

    });
};

using the above code snippet you can fetch the data in subscriber gadget.

Where “topic” keeps the data about the publisher,“data” keeps the message published by the publisher and “subscriberData” keeps the data about the subscriber.

You can download the source code of two gadgets from here.

After creating these two gadget you need to add them to a dashboard. Then click on settings of the subscriber gadget and then you can see two buttons as shown below.


Click on this button and then you will be able to see the check box with publisher name as shown in below figure.

Please put the tick in both places. Now click on “view” button on your dashboard.
Now you can select a fruit name from publisher gadget and then you can see the image of the fruit in subscriber gadget.
The output of this example is as shown in below.


[Analytics Dashboards]How to Create a custom gadget in WSO2 Dashboard Designer .


We can host our own gadgets which are implemented using specific requirements in analytics dashboard. This blog post guide you to create and deploy a custom gadget in analytics dashboard.
To do this you need to run the WSO2 Data Analytic Server in your machine.

Step 1 : Create index.xml

You need to create a folder for your custom gadget inside 
<DAS_HOME>/repository/deployment/server/jaggeryapps/portal/store/carbon.super/gadget/
Here I created a folder called hello-world.
Add the following index.xml file inside your custom gadget folder(in my case inside hello-world folder). 
There is a specific format is available for index.xml file. You can get an idea about this format by reading[1].

index.xml

<?xml version="1.0" encoding="UTF-8" ?>
<Module>
  <ModulePrefs title="Demo Hello World gadget"
     author="LCG"
     height="230"
     scrolling="true">
  </ModulePrefs>
<Content type="html">
  <![CDATA[
     <html>
       <head>
       </head>
       <body>
            <a>Hello World</a>
       </body>
     </html>
   ]]>
</Content>
</Module>

 
Step 2 : Create Gadget.json

This file keeps the gadget definition.

{
    "id":"hello-world",
    "title":"HelloWorldGadget",
    "type":"gadget",
    "thumbnail":"store://gadget/hello-world/index.png",
    "data":{
             "url":"store://gadget/hello-world/index.xml"
      }

}

 
You need to give the proper id title for your gadget. You need to give the location of your gadget image in “thumbnail” and location of the index.xml file for the “url”.

Index.png
 
Folder structure of the gadget.


Now the custom gadget is created. Now you can add this gadget to your dashboard.To add this Click on “design” button in your dashboard.
Then click on following button.


Then you can see your created gadget as shown below. Click on gadget and Drag and drop to the grid to add the gadget to your dashboard. 


Click on “view” button in your dashboard to view your gadget. The view of the hello world gadget is as shown below.

Like wise you can add separate gadgets to one dashboard.

If you want you can edit the gadget. The dashboard designer provides following options.

Click on following icon we can drag and drop the gadget from one grid to another grid in layout.
 
 
Click on following icon we can  maximize the size of the grid.


Click on following icon  we can delete the gadget from dashboard.

Click on following icon we can change the setting of the gadget. If you click on this you can change the default settings of the gadget as shown in below figure.


[Analytics Dashboards] XML Structure of a gadget

We can create our own dashboards in WSO2 Dashboard Designer in DAS. These dashboards contains gadgets. There are some samples in WSO2 Dashboard Designer. But we can create our own custom gadgets and then we can add them to our own dashboard.
When we create a gadget we need to create a XML file. This XML file come up with a common format. In this blog post I am going to introduce about this common format.


As shown in above diagram this XML file is wrapped with <Module> tag and inside it there are three sections as Gadget Preferences , User Preferences and Content Section.

<?xml version="1.0" encoding="UTF-8" ?>

This is the first line of any gadget which is used to indicate the format of the document.
In this case it indicates this document  uses XML format with UTF-8 character encoding.

<module>

This node is use to wrap gadget preferences,user preferences and content section of the gadget.

<ModulePrefs>

This section is used to keep the meta data of the gadget such as title,author,description etc. And also we can define the dimensions of the gadget such as height,width etc under this section.

Ex :

<ModulePrefs title="Bar Chart"
author="WSO2 DAS Server"
height="230"
scrolling="true"
description="A generic Bar Chart gadget, that display patch-count Vs Month.">
</ModulePrefs>

<UserPrefs>

Under this section you can store your own configuration values and allow users to give inputs for the application. This part is an optional thing.

Ex :

<UserPref name="dataSource"
display_name="Data Source"
default_value="/portal/gadgets/bar-chart/datasource/dataFile4.jag">
</UserPref>

<Content>

Under this section you can write your own code of the gadget implementation such as HTML,Javascript,CSS etc.

Ex : If we use HTML then the content is defined as shown below.

<Content type="html">
<![CDATA[
<html>
<head>
</head>
<body >
</body>
</html>
]]>
</Content>


[Analytics Dashboards]How to Create a Dashboard in WSO2 Dashboard Designer.


In this blog post I'm demonstrating you how to create a dashboard in WSO2 Dashboard Designer.
WSO2 Dashboard Designer is an application which facilitate to create our own dashboards .

You need WSO2 Data Analytic Server for this.

You can access the analytics dashboard application in WSO2 DAS through the following URL.
https://<HOST_NAME>:<PORT>/portal/dashboards


Then you will receive the login screen as shown below.


After the login you can see the dashboards which are already created.To create a new dashboard click on CREATE DASHBOARD button.


Then You can see the Dashboard Configuration window as shown below. There you need to give a proper name and a description of the dashboard(optional).


After you click on Next you will receive a window to choose a layout for the dashboard.
In that layout you can add gadgets to the dashboard.


Click on following icon and then click on DASHBOARD from drop down.


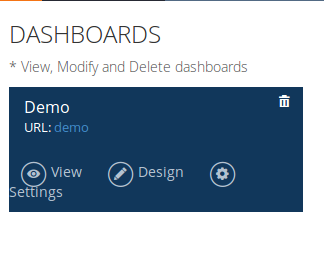
Now you can view the created dashboard as shown below.

 
You can View your dashboard by click on “View” and you can edit the dashboard by click on “Design”.
Now you are done with creating a dashboard in WSO2 Dashboard designer.After creating the dashboard you can add gadgets to the dashboard.


Saturday, February 13, 2016

[WSO2 ESB] How to Use Property Mediator.


Prerequisites.

WSO2 ESB.

In this post I'm going to demonstrate how to use the ESB property mediator.
The property mediator can use as a variable in programming language. We can set a value in the property mediator and we can use it by property name in other operations of the code.
In the following example proxy , I added a property called “CompanyName” and used it inside the log mediator .

Steps to add a Property Mediator.

Go to design view of your created proxy service.
Then click on Add Child → Core → Property


  Then you will get a property mediator setting console as shown in below figure.


Name : A name for the property.

Action : Using this we can set or remove a property from the message context.

Set Action as : If you are setting a static value for the property then you need select the Value option . If you are setting a dynamic value for the property then you need to select Expression option.

Type: Data type of the property. (String, Boolean, Integer, float, long etc.)

Value : value of the property. If you are setting a dynamic value for the property then you need to use the Xpath expression here.

Ex: If you need to set the Id as a property from following XML response,
<project>
<id>10</id>
<name>WSO2 Governance Registry</name>
</project>

then you need to set the following Xpath as the value.
//project/id
Pattern: We can use regular expression here to evaluate value or expression of the property.

After adding the property then you can use it by property name in other operations.
You can retrieve the property value by using 'get-property('Name of the Property')'.

In the following example proxy I used the above property (CompanyName) inside the log mediator.
Then the output is as shown below.


 Proxy
       
<proxy name="Demo" startonload="true" statistics="disable" trace="disable" transports="https,http" xmlns="http://ws.apache.org/ns/synapse">
   <target>
      <insequence>
         <property name="CompanyName" scope="default" type="STRING" value="WSO2">
         <log>
            <property expression="get-property('CompanyName')" name="Value_Of_Property">
         </property></log>
      </property></insequence>
   </target>
   <description>
</description></proxy>


References [1].https://docs.wso2.com/display/ESB481/Property+Mediator